Luncheon Kingdom Power Moon 49 Found With Luncheon Kingdom Art

Welcome to our ultimate guide for collecting every Power Moon from the Tiffin Kingdom in Super Mario Odyssey! Below, y'all'll find maps detailing the exact location for all 68 of the Power Moons located in this Kingdom, as well every bit descriptions on how to get each and every one of them.
The numbers on the maps correspond to the relevant Power Moon listed below and, whilst about of them appear in that spot from the beginning (or after you've completed the story at least), it is worth nothing that sometimes you are required to perform a specific activity to make it appear. Utilise a combination of our maps and walkthrough data to grab each of the Power Moons with ease. Relish!
Luncheon Kingdom Power Moons (one-28)
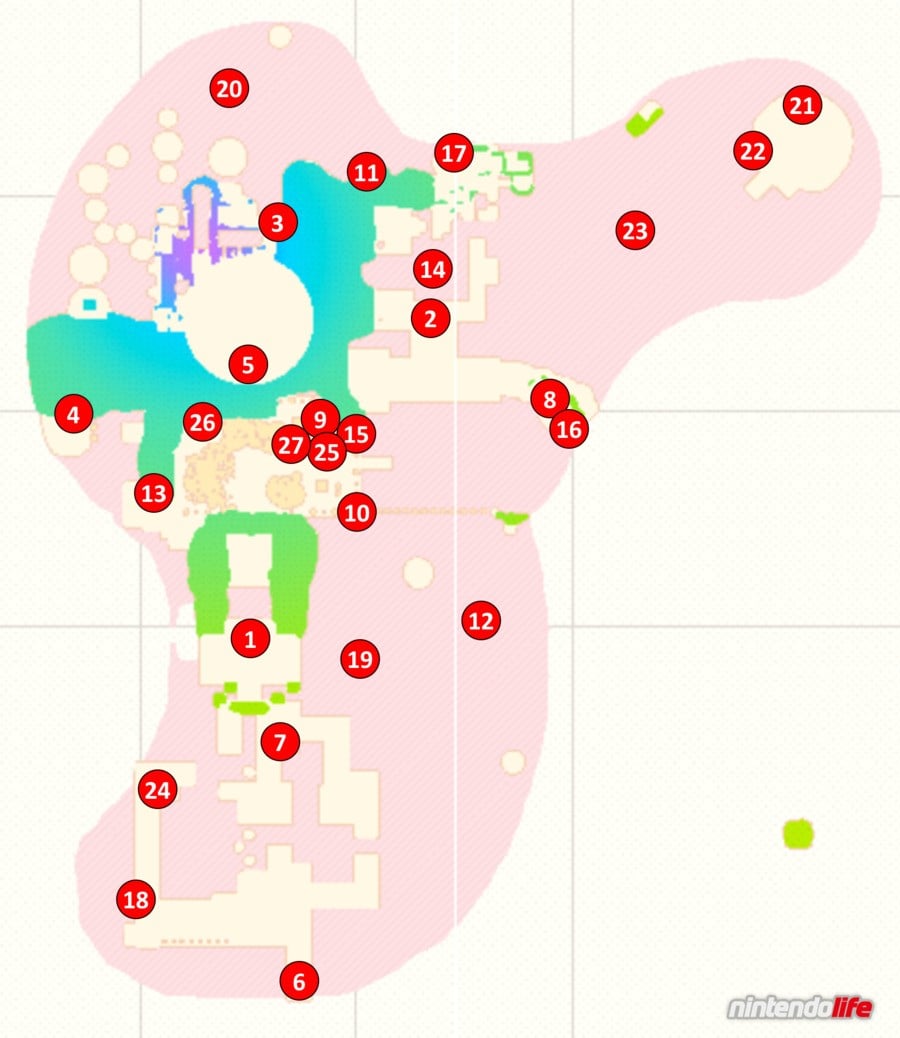
ane. The Broodals Are After Some Cookin': This Ability Moon will be yours when you manage to defeat Spewart the Broodal.
ii. Under the Cheese Rocks: As you progress through the story in the Luncheon Kingdom, you'll come to an area with two Hammer Bros. Capture one of the Hammer Bros. (who are actually throwing saucepans) and smash all of the cheese rocks to the w. You'll unveil a lever that can exist pulled to reveal a Power Moon.
3. Big Pot on the Volcano: Dive In!: Eventually you'll find yourself at the Meat Plateau and, at the peak, you'll see a big chunk of meat. Capture the meat and you lot'll be taken away by the Cookatiel to a big pot. From at that place, jump across the various ingredients until you lot accomplish the Power Moon.
4. Climb Up the Cascading Magma: Head to location number four on our map (accessed by heading westward from Peronza Plaza) to find a doorway-like entrance to a cave. Inside, capture a Lava Bubble and make your way upwards the pink/purple waterfall. When you accomplish the end of this area, you'll notice a unmarried lantern that is unlit - spring into the lantern equally a Lava Chimera to light information technology and reveal your Power Moon.
v. Cookatiel Showdown!: From the Acme of the Peak Climb checkpoint flag, capture a Lava Bubble and spring into the nearby cannon to launch yourself into the behemothic cooking pot. You'll enter a battle with the Cookatiel and, after you get the victory, you'll be rewarded with a Power Moon.
vi. Piled on the Salt: This Ability Moon is located on a high platform at location number 6 on our map. The easiest way to get there is to return to where you collected Power Moon number 1 (simply southward of Peronza Plaza), spring up onto the nearby rooftops to the s, and make your manner over the buildings until you reach the Power Moon (which you lot should come across glowing in the altitude).
vii. Lurking in the Colonnade'due south Shadow: For this Power Moon, you'll demand to capture one of the Lava Bubbles just due north of the Odyssey and travel through the pink lava until you lot attain location 7 on our map. At that location, you should notice a small platform within the lava with a rock platform merely backside that. Jump up onto this stone platform to find a modest alcove with a Power Moon within.
8. Atop the Bulging Crag: Warp to the Peronza Plaza checkpoint flag and head to the east of town. When you reach the edge, capture a Lava Bubble and jump into the cannon about the wooden pegs in the lava in front of y'all. Equally you wing through the cannon'southward flying path, you lot'll need to press 'ZL' to release the Lava Bubble simply as y'all are flight over a blue mountain - this will allow you to fall down as Mario and collect the Power Moon sitting on the superlative of this mountain.
9. Is This an Ingredient As well?!: Just to the left of the Crazy Cap shop in Peronza Plaza, you'll find a small aisle with a pile of crates at the dorsum. Smash these crates to reveal this Ability Moon.
10. Atop a Cavalcade in a Row: Peronza Plaza is surrounded by tall pillars and the ane in the southeast corner contains a Power Moon on its tiptop. Bound up onto the large vegetables in the plaza to reach higher ground (or the buildings as they are an choice to do this too) so that you tin leap onto any of the pillars around the edge of town. Jump from pillar to pillar until yous accomplish the one in question, and and so perform a ground pound on the glowing patch to reveal a Ability Moon.
11. Surrounded by Alpine Mountains: Warp to the Meat Plateau checkpoint flag and long jump from the area you are standing on in a westerly management, landing on the blueish mountain below. You should observe that one small-scale jagged chip of this mount (on its northern side) has a glowing spot. If y'all footing pound this spot, you'll reveal a Power Moon.
12. Island of Salt Floating in the Lava: Merely to the southeast of the Table salt-Pile Isle checkpoint flag is a second island covered in common salt. Capture a Lava Bubble to accomplish it so perform a ground pound in the centre of the island to get a Power Moon.
xiii. Overlooking a Bunch of Ingredients: Warp to the Top of the Pinnacle Climb checkpoint flag, capture a Lava Bubble, and jump into the cannon to fly over to the giant cooking pot. From this pot, you lot'll need look down to Peronza Plaza beneath, looking out for the bluish mountains just to the west of it (location thirteen on our map). Jump out of the pot aiming for this area - if y'all go far onto the mountain, you lot'll exist able to caput south along it to observe the Power Moon.
xiv. Calorie-free the Lantern on the Small Island: Warp to the Path to the Meat Plateau checkpoint flag and look straight in front of you - you'll observe an unlit lantern sitting on its own small island. Simply capture a nearby Lava Bubble, and leap onto this lantern to low-cal it and reveal a Ability Moon.
15. Gold Turnip Recipe ane: But to the correct of the Crazy Cap store you'll run across three turnips buried in the ground. Utilise Cappy on the i in the middle (information technology'll be gold), and and then carry it over to large cooking pot in Peronza Plaza to receive a Power Moon.
16. Gilt Turnip Recipe 2: Follow the instructions for Power Moon number 8 to achieve the blue mount located there. Just beyond that Power Moon there are 3 turnips - use Cappy on the heart ane (it'll be aureate) and pick it up. Brand your style back to Peronza Plaza by dropping downward to the area around the Path to the Meat Plateau checkpoint flag and heading over to the westward. After you've hopped over the mountain into the plaza, throw the turnip into the large cooking pot to receive a Power Moon.
17. Golden Turnip Recipe 3: Warp to the Path to the Meat Plateau checkpoint flag and make your style north until you reach the area with the ramps. Capture the Hammer Bro there and follow the pocket-size platforms effectually to the right of these ramps - you'll eventually find a hidden cheese rock. Blast this stone to reveal a golden turnip - you lot'll need to take this turnip all the way back to the big cooking pot in Peronza Plaza by going back the way you came and heading over the mountains just beyond the original cheese rocks. Throw it in the pot to be rewarded with a Power Moon.
eighteen. Luncheon Kingdom Timer Challenge 1: Flick yourself upwards the 2 forks that are stuck in the wall just behind the Odyssey to find a scarecrow. Throw Cappy at the scarecrow, and then use wall jumps to travel through the platforming section that appears, to get the Power Moon.
nineteen. Tiffin Kingdom Timer Challenge 2: You'll detect a scarecrow south of Peronza Plaza, looking out onto the lava towards location nineteen on our map from the mainland just to the west of it. Throw Cappy at this scarecrow, and so encounter the platform that appears to collect the key and dorsum again to get the Power Moon. Go on in listen that the purple blocks will fade away if you impact them and then you'll need to allow yourself room for two trips.
20. Luncheon Kingdom Timer Claiming iii: Warp to the Start of the Peak Climb checkpoint flag and wait behind you to see a scarecrow. After throwing Cappy at this scarecrow, two platforms will announced that can be manipulated with Mario'south weight. Tip the platforms to your favour - allowing y'all to sew them and jump onto the next - to collect the fundamental, and then brand your style dorsum for the Ability Moon.
21. Below the Rolling Vegetables: Make your style to the Remote Island in the Lava in the northeast of the map. Spring into the green pipage on this island, and brand your way through this 2D section, to eventually come across a Power Moon.
22. All the Cracks Are Fixed: On the same island as Ability Moon 21, talk to the Volbanan standing next to the checkpoint flag. You lot'll notice out that all of the cracks on the island demand to be stock-still so head around the unabridged island, ground pounding every one of them and, when yous've managed to get every last one, you'll be able to merits your Power Moon as a reward.
23. Taking Notes: Pond in Magma: Just to the westward of the Remote Island in the Lava, you should spot a glowing treble clef hovering above the lava. Touch this treble clef, and so collect all of the music notes that lead you towards that island to receive a Power Moon.
24. Beloved Above the Lava: You'll discover four Goombas in the area about the Odyssey. Capture 1 of them, and and so jump onto the others, to form a small tower of four. With your tower assembled, caput over to the giant corn on the cob and make it roll over to the Goombette past using the weight of the belfry strategically. When you lot brand it to the Goombette, she'll reward you with a Power Moon.
25. Shopping in Mount Volbono: You tin buy this Power Moon from this Kingdom's Crazy Cap store. It'll cost you 100 gilt coins.
26. Luncheon Kingdom Slots: You'll find a slots edifice at surface area number 26 on our map above (just behind some vegetables in Peronza Plaza). Head inside and play the game - you'll need to make each icon cease on the Power Moon by using Cappy.
27. A Strong Simmer: For this Ability Moon, you lot'll demand to be wearing the Chef Hat and Chef Accommodate from this Kingdom's Crazy Cap store. When you are wearing these, talk to the Volbonan standing in front of a locked door in Peronza Plaza. Inside this door, capture a Lava Bubble and jump into the large pot to receive a Power Moon.
28. An Farthermost Simmer (see location 27): Backside the same door equally Power Moon 27, capture one of the Lava Bubbling and head to the other cease of the room. You'll need to hit the Magmatoes with Cappy to create a path heading upwardly the steps for a Lava Bubble to be able to travel in. When they make a suitable path right to the top, capture a Lava Chimera, leap through the puddles you lot've created, and then into the second large pot to receive a 2nd Power Moon.
Tiffin Kingdom Power Moons (29-56)
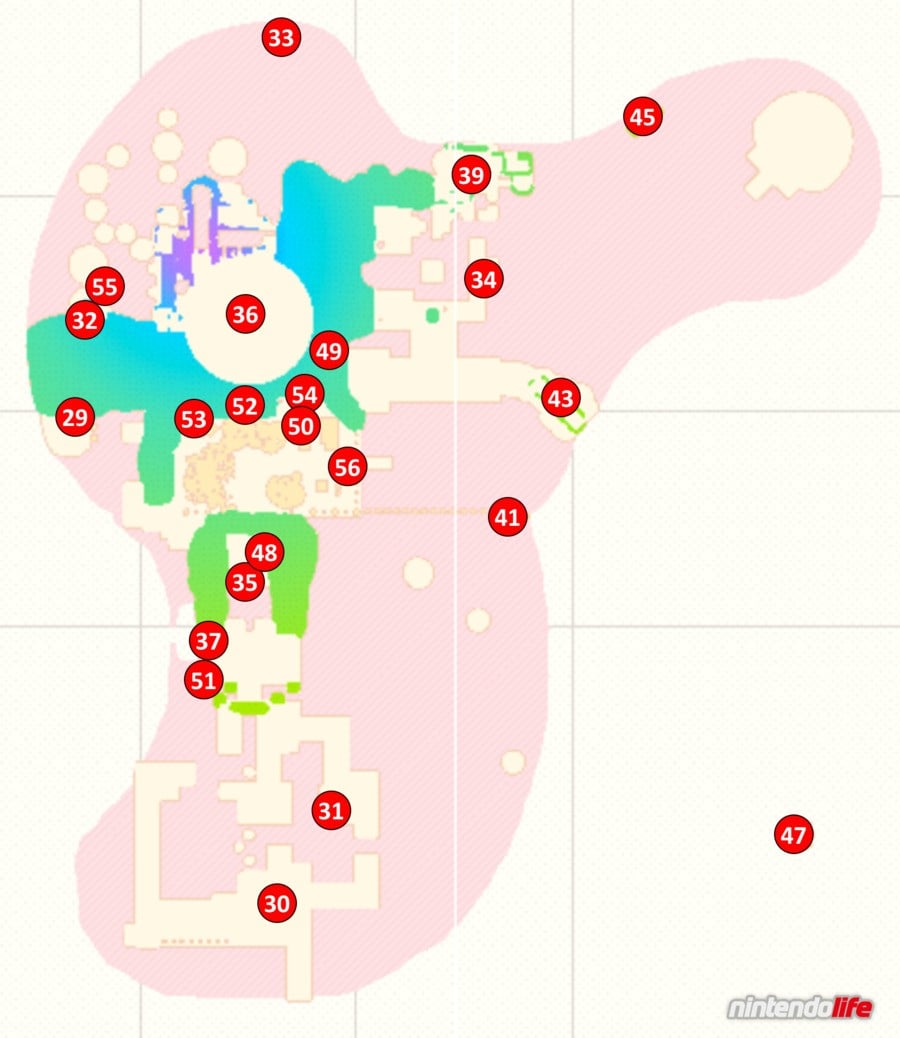
29. Alcove Behind the Pillars of Magma: Warp to the Volcano Cave Archway checkpoint flag, capture one of the Lava Bubbling, and then swim over to the doorway-like cave to the north. Inside, capture some other Lava Bubble and brand your way up the ramp in front end of you. When you lot reach the top, jump down to the geysers below and turn effectually - if you apply the geysers wisely, you can jump into a hidden section containing a Power Moon.
30. Treasure Beneath the Cheese Rocks: Head to the Path to the Meat Plateau checkpoint flag and capture one of the nearby Hammer Bros. You'll need to hop your fashion all the back to the Odyssey, over the cheese rocks and the mount steps and through the Plaza. Opposite the Odyssey, on a wall to west of information technology, you'll observe some more cheese rocks. Smash these rocks to reveal a glowing patch which - when ground pounded - will reveal a Power Moon.
31. Calorie-free the Two Flames: Almost the Odyssey, capture a Fire Bro. and take it over to the 2 lanterns at location 31 on our map (y'all'll demand to hop over some grates to reach it). Throw fireballs at both lanterns to reveal a Power Moon.
32. Light the Far-Off Lanterns: Warp to the Top of the Elevation Climb checkpoint flag and spring downward to the level below where you can find a Lava Bubble. Capture the Lava Bubble, and bound off to the lava-sea below where you should spot two lanterns and a door at location 32 on our map. Jump into 1 of the lanterns as the Lava Chimera to light it, and then land on the platform safely. To light the 2nd one, stand up in between the 2d lantern and the nearby Burn down Piranha Plant and so that it launches a fireball at it. When both are lit, yous'll receive a Power Moon.
33. Bon Appétit, Captain Toad!: Warp to the Top of the Peak Climb checkpoint flag and leap downwardly to the level below where yous tin find a Lava Bubble. Capture the Lava Chimera, and jump off to the lava-ocean below - you'll demand to employ the Lava Bubble to swim all the fashion up to location 33 on our map from here. When you get at that place, chat to Helm Toad to receive a Power Moon.
34. The Treasure Chest in the Veggies: Warp to the Path to the Meat Plateau checkpoint flag and jump upwardly onto the sloped wall on the right. When you reach the section with three royal regional coins, turn the camera around to look over the edge on the correct hand side. You'll meet a red door below and, if you lot enter it, you'll come up beyond a treasure chest containing a Power Moon.
35. Caught Hopping at the Volcano!: Warp to the Peronza Plaza checkpoint flag and turn around to the south to see a rabbit hopping around. You'll need to chase it, using Cappy to stun it if necessary, to make contact with information technology and receive your Power Moon.
36. Taking Notes: Big Pot Swim: Warp to the Acme of the Peak Climb checkpoint flag, capture a Lava Bubble, and jump into the cannon to launch yourself up to the giant cooking pot. In the middle of the pot you'll notice a treble clef - touch it, and and then collect all of the music notes that appear to receive a Power Moon. You may notice it useful to clear your path by bumping into the chunks of food before you start the timer.
37. Magma Swamp: Floating and Sinking: Caput due south from the Peronza Plaza checkpoint flag, over the metallic grate walkway, and wait down to your correct to spot a red lid door. Inside, you'll need to collect all five Moon Shards - the fob is to ever stay in the centre of each platform as these points never go under the lava. When you lot've institute all five, y'all'll exist rewarded with a Power Moon.
38. Corner of the Magma Swamp (see location 37): In the same expanse as Ability Moon 37, turn around right at the showtime to face the entrance. You'll notice some extra platforms to the left of the door which will take you effectually to a hidden Power Moon.
39. Magma Narrow Path: Warp to the Meat Plateau checkpoint flag and keep jumping down to the south. At the very bottom level, below the thin path with a Piranha Establish on it, you should spot a door. Head within and brand your fashion to the finish of the room to find the Power Moon - you'll demand to be slow and steady with the Lava Bubbles on the intricate sections.
40. Crossing to the Magma (see location 39): In the aforementioned area as Power Moon 39, watch out for the section where you have a thin path of lava in between 2 platforms. Use Cappy on the Magmatoes on the right, then capture a Lava Chimera from the platform on the left, and use the puddles you've created to jump over to the lava ledges on the right mitt side. You'll see this extra Ability Moon at the top of these ledges.
41. Fork Flickin' to the Elevation: Capture 1 of the Lava Bubbles on the eastern edge of Peronza Plaza, and bound over the small wooden argue to the right paw side. In the area below, swim over to the cliff that has metallic grates around its border and spring up, releasing the Lava Bubble at the right time and so that Mario can walk on the grates. Head within the red lid door and use the forks within to motion-picture show yourself to the top. You'll find the Power Moon at the end of this challenge.
42. Fork Flickin' Detour (see location 41): In the same area as Power Moon 41, utilize the forks to climb up the cliffs until you accomplish the very end. When you lot reach the area where two forks would moving picture you upward to the Power Moon, use the 1 on the right to fling yourself over to the right instead. You'll land on a bonus area with a 2d Power Moon.
43. Excavate 'n' Search the Cheese Rocks: Warp to the Path to the Meat Plateau checkpoint flag and capture one of the Hammer Bros. nearby. Caput over to the e, around the left side of the cliff there, to find a cheese rock that you can smash open. Enter the scarlet lid door behind these rocks, capture the Hammer Bro inside, and throw your saucepans all over the place to notice the 5 Moon Shards inside. When you have all five, you'll receive a Power Moon.
44. Climb the Cheese Rocks (run into location 43): In the same area as Power Moon 43, capture the Hammer Bro. and turn to face the alpine cavalcade of cheese merely to the correct of its starting position. Carefully style some stairs out of the column, and then nail open the rocks at the very top, to reveal a subconscious Power Moon.
45. Spinning Athletics Cease Goal: Warp to the Remote Island in the Lava, capture a Lava Bubble, and caput over to the behind of the island at location 45 on our map. Enter the door here - you'll have to lose Cappy temporarily to do and then - and brand your way over the spinning platforms within. Yous'll find a Ability Moon waiting for you at the end.
46. Taking Notes: Spinning Athletics (run across location 45): In the same area as Power Moon 45, y'all should spot a glowing treble clef floating on 1 of the light greenish, round platforms. You'll demand to touch the treble clef, and the collect all of the music notes that announced, to receive this Power Moon. The all-time strategy is to collect the notes that are below the main platform start, and then do a small bound back up towards the main platform and so that Mario is left dangling off the edge. The platform will spin around by itself then yous'll automatically collect all of the notes in time.
47. Hush-hush Path to Mount Volbono!: To become this Power Moon, you'll demand to re-enter this Kingdom through a warp painting found in a unlike Kingdom. Depending on your choices in the game, this warp painting may appear in one of two places - the Lake Kingdom, or the Wooded Kingdom.
If you decided to go to the Wooded Kingdom before the Lake Kingdom, the warp painting volition appear in the Lake Kingdom. To detect it there, warp to the Courtyard checkpoint flag and jump into the pool where you can see Lakitu fishing. In the deep cease, underwater, you'll observe the warp painting.
If you decided to get the Lake Kingdom before the Wooded Kingdom, the warp painting will announced in the Wooded Kingdom. To find it there, warp to the Forest Charging Station and throw Cappy at the scarecrow at i of the stations. Climb upwards to the peak of the platforms that appear, using a backflip to reach the area to a higher place the platforms before the timer runs out. Yous'll find a metal cube here with the painting fastened to i of its sides.
48. A Tourist in the Dejeuner Kingdom!: To get this Power Moon, you will first need to talk to the Tostarenan in the Sand Kingdom who wants to ride a taxi. From there, you'll need to speak to him again in the Metro Kingdom, then the Cascade Kingdom, before he eventually winds up here in the Tiffin Kingdom. If you've spoken to him at all of these places, yous should spot him and the taxi at the archway to Peronza Plaza.
49. Found with Luncheon Kingdom Art: To find this Kingdom's hint art, you'll need to warp to the Path to the Meat Plateau checkpoint flag, get past the Hammer Bros. and cheese rocks, and climb upwards onto the blueish mountain steps that would take you to Peronza Plaza. Instead of heading to the plaza, though, turn to the right and follow the ledge, heading towards location 49 on our map.
The art depicts the Seaside Kingdom - wing there and warp to the Body of water Trench Due west checkpoint flag. The surface area pictured in the hint art is just to the east of this location, so expect around carefully until you spot information technology. And then perform a ground pound on the surface area shown in the picture to receive the Power Moon.
50. The Rooftop Lantern: Warp to the Path to the Meat Plateau checkpoint flag and capture one of the nearby Hammer Bros. Use it to smash away the cheese rocks on the steps to the west, and so release it. Now head north, capture a Fire Bro., and return to the steps you've merely created. Jump up the steps, so over the steps in the blue mountain on the left to reach the back of Peronza Plaza. Spring downwardly onto the building below, and then up once more onto the building with an unlit lantern - if you throw a fireball at this lantern you will receive a Power Moon.
51. Jammin' in the Luncheon Kingdom: Warp to the Peronza Plaza checkpoint flag and head south - yous'll notice a Toad wearing headphones in the expanse beneath you. Talk to the Toad and play him rails 46 'Honeylune Ridge: Escape' to receive a Power Moon.
52. Mechanic: Repairs Consummate!: To become this Power Moon you lot'll need to be wearing the Mechanic Cap and the Mechanic Outfit - available from the Crazy Cap store for 200 gold coins combined. When you are wearing the correct outfit, walk behind the building with the locked door just to the left of the Crazy Cap shop and and so look over to the left. You'll notice i of the watering can robots from the Wooded Kingdom on a ledge up above. Speak to it, whilst wearing the mechanic clothes, to receive this Power Moon.
53. Diving from the Big Pot!: Warp to the Summit of the Acme Climb checkpoint flag, capture a Lava Chimera, and spring into the cannon to launch yourself over to the huge cooking pot. If you look down below to the southwest (in the top-left corner of Peronza Plaza) you lot'll see a smaller cooking pot. You lot need to swoop down from this large pot, into the smaller one below to receive a Power Moon. You may need several attempts at this to learn the verbal direction and command stick pressure level required for your leap.
54. Chapeau-and-Seek: Amid the Food: In Peronza Plaza, walk to the left of the building with the locked door (simply to the left of the Crazy Cap store). Backside the buildings, you'll spot a Volbanan. Walk behind it and printing 'A' to talk - you'll come across that its hat is actually a Bonneter and you will receive a Ability Moon for discovering it.
55. Dejeuner Kingdom: Regular Cup: Head to the island at location 55 on our map (accessed by jumping down from the Top of the Peak Climb checkpoint) to find a Koopa who will challenge y'all to a race. If yous win, y'all'll receive a Power Moon. The trick to this 1 is to plough to the right immediately at the start of the race, using long jumps and Cappy dives to travel across the small-scale platforms onto the expanse ahead. You'll instantly exist quite far in front end and, by using the forks and Lava Bubbles on the route up the mountain, you should be able to keep your position one time you know the course.
56. Peach in the Luncheon Kingdom: Warp to the Peronza Plaza and head over to the far east side of boondocks. You lot'll find Princess Peach continuing in forepart of a column just before the lava. Talk to her to receive a Power Moon.
Luncheon Kingdom 'Moon Rock' Ability Moons (57-68)
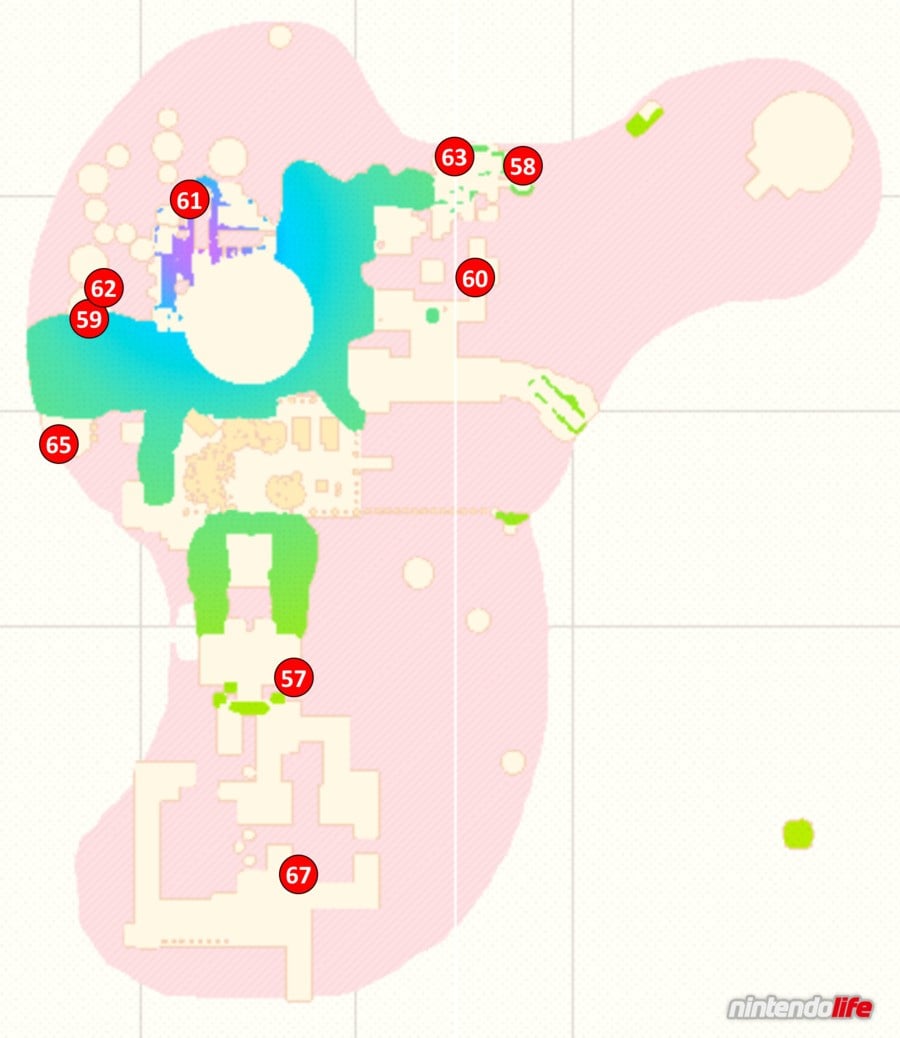
These Power Moons volition become available to you when yous have smashed the Moon Rock located in this Kingdom.
57. From Within a Brilliant Stone: Warp to the Peronza Plaza checkpoint flag and head southward until you lot reach the area with the scarecrow. Head to the southern edge of this area (pretty shut to where the scarecrow is standing) and wait downwards over the edge - y'all'll notice a Ability Moon hovering over a modest blue platform.
58. Under the Meat Plateau: Warp to the Path to the Meat Plateau checkpoint flag and capture one of the nearby Lava Bubbles. Swim through the lava and make your manner out of this section to the east, then swim up to location 58 on our map. Using the Lava Bubble's spring, you tin reach a Power Moon that is hovering underneath a green stone - you lot tin spot its shadow in the lava.
59. On Peak of a Tall, Tall Roof: Warp to the Height of the Peak Climb checkpoint and wait downwards to the due west - you lot'll see a Power Moon sitting on a roof just above a door which has lanterns on either side. Perform a long jump, and so dive with Cappy as you lot approach, to country safely onto this roof and collect your Ability Moon.
sixty. From a Crack in the Hard Ground: Warp to the Path to the Meat Plateau checkpoint flag and utilise a backflip to jump onto the sloped platform on the right. Ground pound on the second fissure in the flooring here to find a Power Moon.
61. By the Cannon Pointed at the Big Pot: Warp to the Top of the Peak Climb checkpoint and jump upwards onto the thin rocks on the left hand side. Make your way up these rocks extremely carefully - it is very easy to fall off here - and continue going towards the cannon at the top. Eventually, right near the cannon, you'll come across a glowing role of the rock - footing pound here to reveal a Power Moon.
62. Luncheon Kingdom: Principal Cup: Head to the island at location 62 on our map (accessed by jumping downwards from the Top of the Meridian Climb checkpoint) to challenge the Koopa to a 2nd race. If you win, you'll receive some other Power Moon. As before, the trick to this one is to plough to the right immediately at the start of the race, using long jumps and Cappy dives to travel across the small platforms onto the area ahead. You'll instantly be quite far in front and, past using the forks and Lava Bubbles on the route up the mount, you should be able to keep your position once you know the class.
63. Stepping Over the Gears: Warp to the Meat Plateau and enter the grey warp pipe well-nigh the flag. Within, employ the Bitefrosts and Fire Bros. to help you reach the end of the level - a Power Moon is waiting for yous at the other end.
64. Lanterns on the Gear Steps (see location 63): For this Ability Moon, you'll need to lite every single lantern inside the same area as Ability Moon 63. Explore the expanse thoroughly, and use the Fire Bros. to lite every lantern you come up across. There should exist iv in full, with the last one requiring a super long throw downward from where y'all are standing.
65. Volcano Cave Cruisin': Warp to the Volcano Cavern Entrance checkpoint flag, capture a Lava Bubble, and swim north to enter the grayness warp piping sitting in front of the cave. Inside, you'll need to throw Cappy around to create cloud platforms and keep your eye on where the lava is as you travel around the room. When you reach the end you lot'll find a Ability Moon waiting for you.
66. Volcano Cavern and Mysterious Clouds (see location 65): Inside the same area as Power Moon 65, travel through the room until your platform starts to rise up, only earlier it starts to head dorsum to the left. You'll notice some extra bachelor platforms that tin can exist created hither - make them appear, perform backflips when necessary to land on them, and make your way up to this bonus Power Moon.
67. Treasure of the Lava Islands: From the Odyssey, head over to the wall where the cheese rocks are and use the fork only to the left of them to reach the area above. Enter the gray warp piping here and make your way to the end of the room to become the Ability Moon. Make certain to capture Lava Bubbling earlier any platforms you are walking on reach unescapable lava.
68. Flying Over the Lava Islands (see location 67): In the same expanse equally Power moon 67, expect out for a cannon about the start of the room. When yous enter the cannon, you'll be able to see this Ability Moon before you brand the launch. As you lot fly from the cannon, employ 'ZL' to release the Lava Bubble at but the right time to land on this Power Moon.
We promise that you lot accept found this guide on collecting all Power Moons in Super Mario Odyssey's Luncheon Kingdom useful. Permit us know if you've managed to grab them all with a comment below.
Source: https://www.nintendolife.com/guides/guide-super-mario-odyssey-luncheon-kingdom-power-moon-locations-and-walkthrough
0 Response to "Luncheon Kingdom Power Moon 49 Found With Luncheon Kingdom Art"
Post a Comment